Friday, June 20, 2014

Notes on adding the Fuse Cartridge using RPM.

Fuse can be used on OpenShift using the Fuse Cartridge, the code for which can be found on github:https://github.com/jboss-fuse/fuse-openshift-cartridge. During the setup phase of a Fuse based application on OpenShift it downloads a big zipfile. I've been working on an rpm that includes the zip file to avoid this big download, to shorten the application setup and so it doesn't depend on a network connection to the outside.

At the moment the rpm is build from the openshift-enterprise-rpm-6.1 branch https://github.com/jboss-fuse/fuse-openshift-cartridge/tree/openshift-enterprise-rpm-6.1, and the finished product is placed in nexus.

If you want to build the rpm by hand use 'rpmdev-setuptree', copy the zip to ~/rpmbuild/SOURCE (this needs to be the cartridge zip containing the fuse.zip), copy the spec file to rpmbuild/SPEC and then build the rpm using 'rpmbuild -ba openshift-origin-cartridge-fuse.spec'.

Next copy the rpm to your OpenShift node and install it using rpm -U , and once it's done restart the
ruby193-mcollective service on node and import cartridge on broker 
 #oo-admin-ctl-cartridge -c import-node --obsolete  --activate 
You can check fuse cartridge is listed by rhc cartridge-list. Note that I only found the oo-admin-ctl-cartridge command on OpenShift Enterprise and not on Origin.

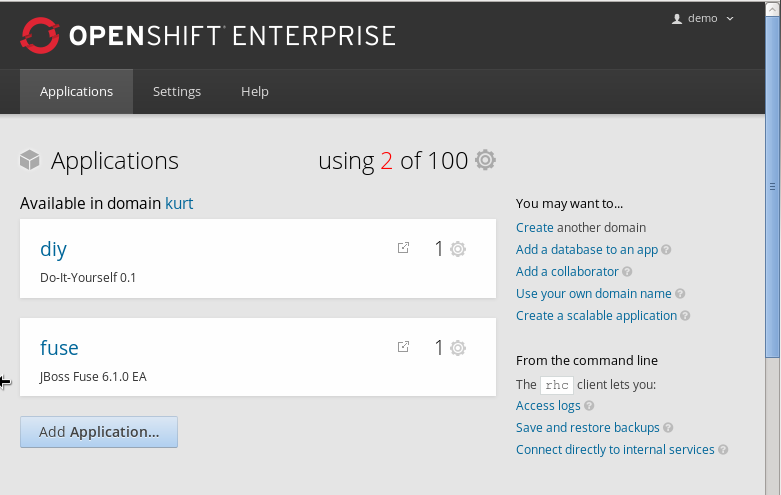
At this point the Fuse application should also be listed on the application page.


You can create a new gear from there or you can use rhc:
rhc app create fuse fuse -g medium
 
 
It should now have created a running Fuse gear. Please note that on my little laptop it took roughtly 15 minutes for it to show up and rhc and the console were sort of in a frozen state.


Add Medium Gear Capablity on OpenShift

The OpenShift Virtual Machine download is pre-configured with one node, in one district with a small gear profile. There are two ways to add another gear size
  • add another node, in a new district with medium gears, but easier is it to
  • remove the district restriction and allow both small and medium gears.
Edit the /etc/openshift/plugins.d/openshift-origin-msg-broker-mcollective.conf, and set
DISTRICTS_ENABLED=false
DISTRICTS_REQUIRE_FOR_APP_CREATE=false
NODE_PROFILE_ENABLED=false
ZONES_REQUIRE_FOR_APP_CREATE=false

Next in edit the /etc/openshift/broker.conf and set
VALID_GEAR_SIZES="small,medium"
DEFAULT_GEAR_CAPABILITIES="small,medium"

Then restart the node to let the changed take effect. If you have an existing user you may need to add the medium capability explicitly  using something like oo-admin-ctl-user -l demo --addgearsize medium.

Notes on Getting started with OpenShift

There are two versions of the RedHat Cloud: OpenShift Origin (the project) and OpenShift Enterprise. I needed the completely stable version, so I downloaded the OpenShift from https://access.redhat.com/home.  Navigate to the OpenShift Enterprise page, as shown in Figure 1.

Figure 1. Download OSEoD Virtual Machine

From here I downloaded the OSEoD Virtual Machine, which is a (large) vmdk file. This vm has a 10 Gb hard drive with only a few hunderd Mb of free space on it. On OSX I'm using VirtualBox and to increase this drive you will need to convert it to a vdi format. There is a great detailed writeup by Thomas Vial on this.

1. Convert to vdi:
VBoxManage clonehd box-disk1.vmdk box-disk1.vdi --format vdi

2. Extend to 30 Gb:
VBoxManage modifyhd box-disk1.vdi --resize 30720 
 
 
3. Now create a new virtual machine and hook it up to this new large file. Then under the settings for the CD/DVD drive point this to the GParted ISO on your disk. Now when you start the OpenShift VM, GParted is stared and you can extend the sda2 partition, and use all the newly created 20Gb. Now apply to the file system. Then disconnect the GParted iso and restart.

4. Now when the OpenShift VM comes up, sudo to root and now the new space needs to be added to the LVM. Check with 'df' what the LVM partition needs to be extended and use '
'lvm vgdisplay' to get the Free PE and using lvm lvdisplay  you can find the Current LE,
the Current LE + FreePE gives the new volume size. Use lvm lvresize -l  
to resize. Finally use resize2fs to use the new size. Verify with 'df' that the LVM is now larger. For more details see the centos docs.

5. Finally there are two small issues you have to workaround, the /etc/resolve.conf is recreated with every reboot of the server you need to manually add 'nameserver 127.0.0.1' back in. The other issue is that the harddrive is set to dynamically allocate space. This process slowed down the creation of an application for me such that OpenShift began to lock up. Copying a huge file into the filesystem, and then deleting it to force the allocation fixed that for me.


Wednesday, March 20, 2013

Friday, March 18, 2011

As if Time isn't difficult enough! I say this is huge bug in java.sql.Timestamp

BACKGROUND
I found a bug in java.sql.Timestamp that was making my unit tests fail
once it a while when the planets aligned just the right way. I was
storing java.util.Date values to a Db using Hibernate and when they come
back out, they are represented as java.sql.Timestamp, which is a small
wrapper around java.util.Date.

ISSUE
In TimeStamp, they are storing the time in whole seconds and the
remaining nanos seperately. In the Timestamp.compareTo, they call the
super class first (but pass the time part only). So methods like
before() and after() are all in error when milliseconds count. Check out the following code:


/*
* Copyright 2001-2009 The Apache Software Foundation.
*
* Licensed under the Apache License, Version 2.0 (the "License");
* you may not use this file except in compliance with the License.
* You may obtain a copy of the License at
* http://www.apache.org/licenses/LICENSE-2.0
*
* Unless required by applicable law or agreed to in writing, software
* distributed under the License is distributed on an "AS IS" BASIS,
* WITHOUT WARRANTIES OR CONDITIONS OF ANY KIND, either express or implied.
* See the License for the specific language governing permissions and
* limitations under the License.
*/
package org.apache.juddi;

import java.sql.Timestamp;
import java.util.Date;

import junit.framework.Assert;

import org.junit.Test;


public class TimeStampDateTest {

@Test
public void testDates() {

java.util.Date startDate = new Date(1300286601055l);
java.util.Date modifiedDate = new Date(1300286601334l);
Timestamp timeStamp = new Timestamp(modifiedDate.getTime());

System.out.println(startDate.getTime() + " startDate " + startDate);
System.out.println(modifiedDate.getTime() + " modifiedDate " + modifiedDate);
System.out.println(timeStamp.getTime() + " modifiedDtDB " + timeStamp);

System.out.print("DT:" + startDate.getTime() + " is before " + modifiedDate.getTime() + ": ");
if (startDate.before(modifiedDate)) {
System.out.println("before");
} else {
System.out.println("after ******* WRONG!!!!");
}
Assert.assertTrue(startDate.before(modifiedDate));

System.out.print("DB:" + startDate.getTime() + " is before " + timeStamp.getTime() + ": ");
if (startDate.before(timeStamp)) {
System.out.println("before");
} else {
System.out.println("after ******* WRONG!!!!");
System.out.println("The reason is a bug in Timestamp, it stores the time (whole seconds) and the nanos seperately," +
"and when running a compareTo it only uses the nanos when the Time part is inconclusive, however" +
"it is not inconclusive because the compareTo from the super class (java.util.Date) DOES" +
"already take into account the millies!");
}
Assert.assertTrue(startDate.before(timeStamp));
}

}


The second time the date comparison will fail and it will print out: 'after ******* WRONG!!!!'.

Yes Really!!

Then I was told to read the javadoc:

"Note: This type is a composite of a java.util.Date and a separate nanoseconds value. Only integral seconds are stored in the java.util.Date component. The fractional seconds - the nanos - are separate. The Timestamp.equals(Object) method never returns true when passed an object that isn't an instance of java.sql.Timestamp, because the nanos component of a date is unknown. As a result, the Timestamp.equals(Object) method is not symmetric with respect to the java.util.Date.equals(Object) method. Also, the hashcode method uses the underlying java.util.Date implementation and therefore does not include nanos in its computation.

Due to the differences between the Timestamp class and the java.util.Date class mentioned above, it is recommended that code not view Timestamp values generically as an instance of java.util.Date. The inheritance relationship between Timestamp and java.util.Date really denotes implementation inheritance, and not type inheritance.
"

Ahh that makes it all better! No no no, this is just crap and so easy to fix. Time skrewed up enough, please don't do this Snoracle!

There's a few of my life that I will never get back. The issue is that my unit test failed when the build machine was fast enough to make milli-seconds count when comparing dates!

GRRRR..

--Kurt

Monday, February 14, 2011

IPhone 3Gs Battery Drain - part 2

OK so after removing all my apps, it was still draining the battery. Turns out the VPN I had installed was causing it. Not sure why it suddenly went sideways. It had been working just fine for about a year.

Now I'm busy putting all my apps back. It's kind off refreshing though to start with a clean phone :).

--Kurt

Sunday, February 13, 2011

IPhone 3Gs Battery Drain - part 1

I've had my iphone for a little over a year, and since last Friday it drains the battery in about 5 hours, this while the day before I could go for 48 hours between charges. I also noticed it being warmish. I figured it is an app that is stuck, however

- hard reset does not alleviate the issue, and
- doing a full restore does not help either.

I figured that before going over to see apple store I would restore it to having the default OS/firmware only. The idea being, that if it still drains in this configuration, then the phone is just defect. Well I did, and.. my phone is fine now! So while this is good news, this must mean that it is an app that is somehow causing the issues. How am I going to find which app is causing the issues?? I guess I have the following options:

1. Leave it the way it is and slow add apps back as I need them
2. Do a full restore and use bisection on app deletion/addition.
3. I guess i could try to figure out which apps I upgraded last week and delete those, hoping that it is one of these updates of last week.
4. There is no taskmon app right? Wouldn't it be great to simply see which process is eating my CPU cycles/battery..

Love to hear your ideas!

Cheers,

--Kurt